I work with Metabase and need to deploy Metabase on Windows Server and using a Reverse Proxy set up on IIS, using URL Rewrite 2 and ARR 3.0, which rewrites the public URL to a private one (localhost) where the content server is running. On the way back out, it changes the private URL back to the public one, and forwards the traffic.
So I implemented a reverse proxy using only web.config on IIS to offload content to a web application as https 7000 that run in http in localhost 7001. Doing so, IIS uses URL Rewrite and acts as a reverse proxy. Adding gzip compression to the mix, and this will improve website performance. This is because the responses that are coming from the back end server are using HTTP Compression, and URL rewrite cannot modify a response that is already compressed. The following HTTP 500.52 URL Rewrite Module Error was thrown:
HTTP Error 500.52
Outbound rewrite rules cannot be applied when the content of the HTTP response is encoded (“gzip”)
There are two ways to work around this:
- turn off compression on the backend server that is delivering the HTTP responses
- or removing the header when the request comes into the IIS reverse proxy and by placing it back when the response leaves the IIS server.
We will regard to the removal and re-instatement of the HTTP header:
1. Create two HTTP Variables in URL Rewrite.
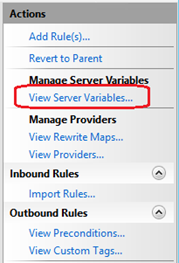
Under Web Applications, choose the one application, and selecting the URL Rewrite Icon and double clicking it in the IIS Manager Console, you will have a View Server Variables
add two Allowed Server Variables:
HTTP_ACCEPT_ENCODING
HTTP_X_ORIGINAL_ACCEPT_ENCODING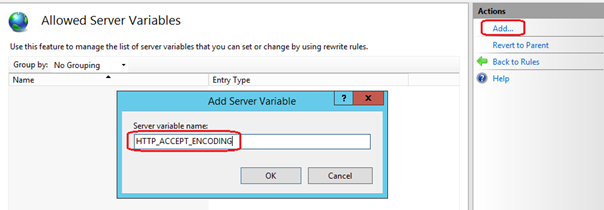
2. Remove the Accept-Encoding header
We will need to use these variables both in the Inbound Rules, to remove the Accept-Encoding header and in the Outbound Rules to place this header back again.
Under Inbound Rules section in Url Rewrite, select Reverse Proxy Inbound Rule 1 rule (you may create this Inbound Rules first) and click the Edit action link,
In the Server Variables section we will need to add the two server variables that we have declared earlier.
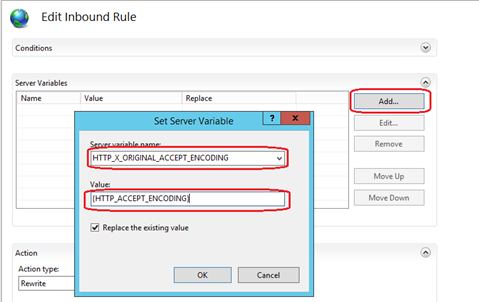
Fill in the Server variable name and the Value as Name–value pair:
HTTP_X_ORIGINAL_ACCEPT_ENCODING: (HTTP_ACCEPT_ENCODING)
HTTP_ACCEPT_ENCODING: *
3. Restore the value of the HTTP_ACCEPT_ENCODING variable
When we receive the responses from the backend server, we need to forward them back to the browser. To be able to correctly do this, we will need to restore the value of the HTTP_ACCEPT_ENCODING variable to what it was before we changed
Create a new Outbound Rule from the Url Rewrite Pane, by clicking the ‘Add Rule’ action link.
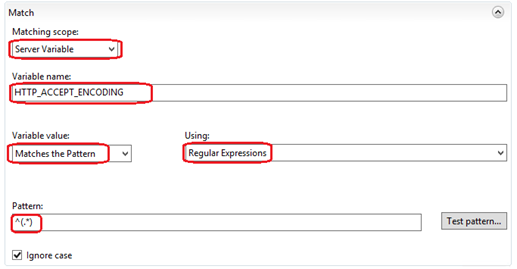
Select Server Variable from the Matching Scope dropdown, and place the HTTP_ACCEPT_ENCODING variable name in the Variable Name textbox. Select ‘Matches the Pattern’ in the Variable Value dropdown and the ‘Regular Expressions’ in the Using dropdown, and place the following pattern ^http(s)?://localhost:7001/(.*) in the Pattern textbox, ex:
In the Actions pane, select Rewrite as an action from the Actions dropdown, and fill the Value textbox. Check the Replace Existing Server variable value checkbox.

Click the Apply button to save the changes entered by this rule to the IIS configuration store.
Tadaa, the web is working like a champion.

Ref:
Original written from my blog: https://nready.net/?p=1347
@Le Quoc Nam, Saigon, 12 Dec 2022
2 responses to “Deploy Metabase on IIS Reverse Proxy with Url Rewrite and Outbound Rules with gzip compression”
When I initially commented I clicked the “Notify me when new comments are added” checkbox and now each time a comment is added I get three e-mails with the same
comment. Is there any way you can remove me from that
service? Thanks!
Hello, Sorry for this inconvenience, I am being big update the website and enhance this feature too. Thank you for your visting me.